| Learning Python Part I |
Learning Python Part III |
Learning Python Part II
It is July 24, 2019, and I am starting on day 1 of part two of my journey into learning the Python programming language.
In my previous part, I installed the Python programming language, and I read the tutorial of the language and talked about what I found when reading the tutorial.
This time I will download Visual Studio Code to use with Python. It has a plugin for Python. Then I will start making a little test program. It would be really nice to see if I could make a Python program that works with Excel. After looking into Excel, I will start to create a program that extracts images from a word document.
I searched for Visual Studio Code, the download was quick. Then I installed it; also, this was quick.
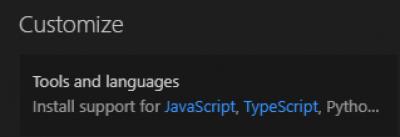
Then I thought I would get to an information page about installing support for Python, so I clicked Python and instead, it installed support for Python. That was quick too.
I really have no idea how Visual Studio Code is supposed to work with Python. To solve this problem, I found a YouTube video about this subject:
Dan Taylor is doing a whirlwind tour into Python.
The first thing Dan suggests was that I would read the documentation about Python at the download page of Visual Studio Code. Started clicking into the links Dan suggested. There are quick link help files all over the place. Started reading just to get to the next place for more help, and more and more, and just before I lost where I was I decided to back to the video of Dan and listen to what he has to say. Funny as it is he said that you could click that link that I had already clicked to get the Python part of Visual Studio Code installed.
I made a little hello-world program just like dan and when I ran it Python came back and said things in yellow, for example, that I had to run an update command to get the latest version of pip. So I did that.
One of the first things Dan did was to create a virtual environment. I had that in the tutorial as well. Dan is talking 44 minutes long, and it is all advanced and fancy. It will be good, but for tonight I had my quota filled.
Day 2, 25 of July 25, 2019.
Tonight I decided on narrowing my search drastically. I searched for “visual studio code python excel” to see that it is indeed possible to do things with Excel and Python.
I found a video about this:
This is by Al Sweigart. He talks about a book he wrote available online at http://automatetheboringstuff.com
Al is really talkative, but that is fine. The video is 55 minutes long, so we will see how far I come tonight. Only about half of the video is Al explaining things. The other part is questions from the audience. I will have a look at that book later, but first, I will follow his youtube video.
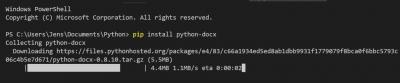
First, I need to install openpyxl. So I open a command line window and does the same thing as Sweigart “pip install openpyxl” hit enter, and it starts installing the stuff. It ends with a rewarding message saying that the installation was successful.
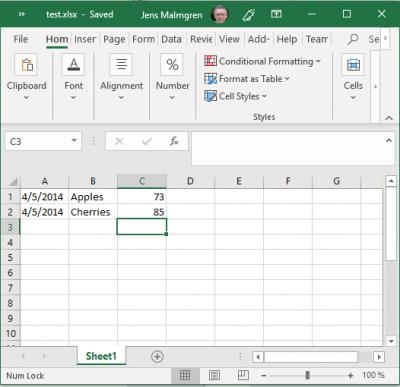
Al has an excel sheet that he is testing with, so I create something similar.
Then he starts programming. So do I.
He was programming in the python console, and I used Visual Studio Code.
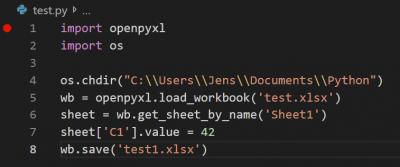
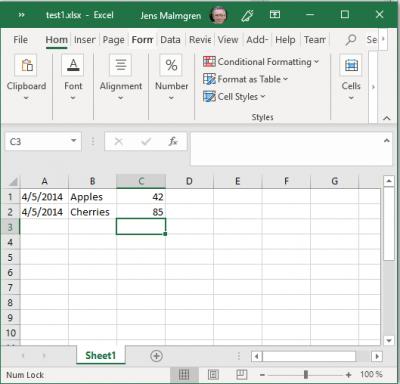
When running it, my program changed the value of C1 to 42 and saved it to a new Excel Workbook.
I have not seen many presentations being so helpful and at the same time failing so much at really presenting the material. Example after example actually went wrong until the explanation halted entirely. The version of the openpyxl had been updated, but all the examples of the presenter had not been updated – so it did not work.
This is really great. I did something in Python, and it was easy enough.
Now there are other python libraries as well. Python-Docx. That is interesting. I will look into that tomorrow.
Day 3, 26 of July 26, 2019
The mission for today is to create a bigger program that will be useful to me. I hope I am not taking on to much here in one go. I decided to create a program that will open a Microsoft Word document and extract all images and put them in a folder. Inside the document below each image, I want to have the name of the image.
So where do we start on this? I search in YouTube for “python Microsoft word-docx” and found this video:
Since I am still learning all this, I tried to enter the installation command of python-Docx in the VS Code console window.
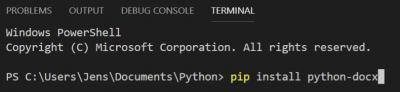
That is also working!
Successfully installed lxml-4.3.4 python-docx-0.8.10
Great!
Then I follow along with Parwiz Farogh. He creates a little program that opens the word document and creates a list. Then that list is filled with the paragraphs of the document. Then he joins the paragraphs and prints them to the console.
It feels like I will have a look at the Excel test example and change the directory that it did and then open the document as Parwiz did, without defining a function, but not walk the paragraphs but walk the images, if that is possible. We will see.
I got stuck on images, got nowhere. To be able to continue, I had to find the documentation for this library.
https://python-docx.readthedocs.io/en/latest/user/shapes.html
It turns out that it is not possible to work with floating images right now in the Python-docx library. That is fine as such because I will get some experience anyway while working with this. When writing my previous paragraph, I had hoped that after pressing on the button next, I would be brought to the full documentation on images. It does not look like that? There is no documentation on how the images are handled.
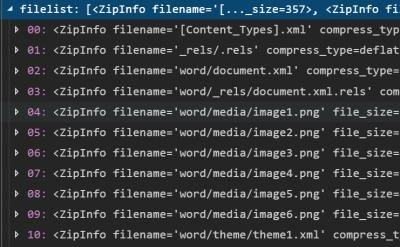
After more research, I discovered that it is not possible to use built-in functionality in python-Docx to extract the images from the word document. It is, however, possible to get the filename of the images used in the document. I created a sample document for trying this and that is actually this very blog post.
I made a copy of that word document and changed the extension of the document to zip. Then I extracted all the content of the word document zip archive.
Then I went into the archive and found the document.xml document. I opened that file in Notepad++ and then I did pretty print with the XML tool.
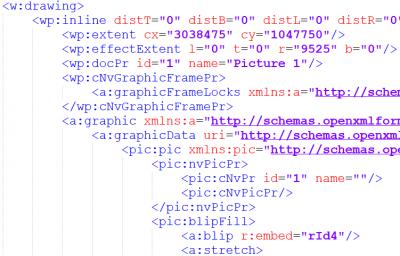
Now look, there is a one on one similarity with the object model exposed in Python.
From this similarity, I make an important conclusion: This module is working on the Word ML data of the word document. The file is not opened from within Microsoft Word, and then via COM+ automation presented to Python. The zip file of the word document is opened and manipulated totally without Microsoft Word.
With this knowledge, I decided that with the help of ZIP file manipulations, I will be able to extract the images from the word document.
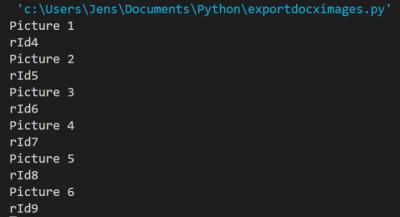
Here is a snippet of my test program:
![]()
And this is the result that it prints:
What can we do with this information?
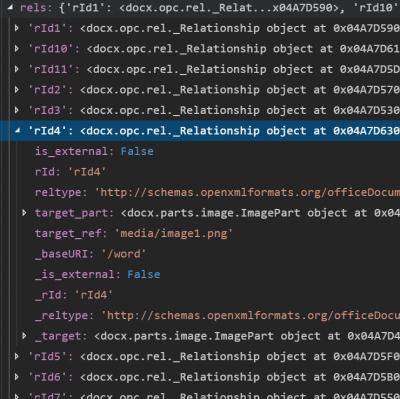
Well since there is a document in the zip archive, the _rels folder of the word document, that looks like this:

This makes it possible to translate rId to media names.
The word/media/ directory in the zip archive contains the images, and they are of png format.
Perhaps this rel table is already available in Python because now when we know that all the things of the XML structure of the word document have been included in the Python object model?
Definitely!
So the action plan now is to start walking the paragraphs or runs or whatever of the document and when there is an image object we know we can get to the media/image filename and then extract that image from the zip archive.
Day 4, 27 of July 28, 2019
Starting walking the document.
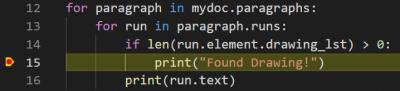
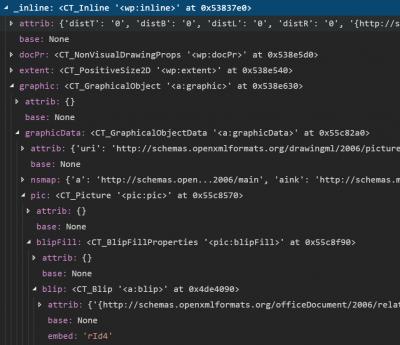
Found out that if the run has elements in the drawing list, then it is a drawing. So then we look into the element in the drawing list and what do we have there?
Not much, really. Not any of the expected information. So what is going on here? We can see that the object here is called Element and there is a namespace given. It was a real challenge to figure out what is going on here.
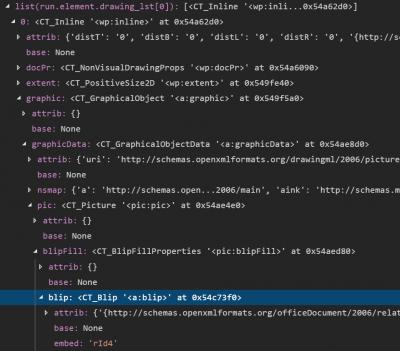
The values exposed was by far not enough of what I needed to get. The breakthrough in the research came when I printed the type description of element 0 in the drawing list.
![]()
I searched for lxml.etree._Element and I found that it is a type of an element in the XML object model for Python.
With that information, I decided to import the XML module in my program.
Then I found out how to show the list of children in an XML element, by calling the function list:
When applying list-method, it became like this:
Here is the output:
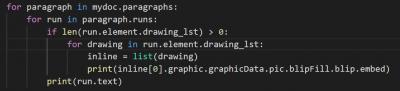
So now we walk the text, and when we found a drawing, we know what Id it has.
Day 5, 28 of July 28, 2019
Last time I found out how to get the ID of the drawing while walking the document. Now we will use that information to find out where the drawing is stored in the zip archive. Perhaps we even have time tonight to extract the image from the archive, but we will see.
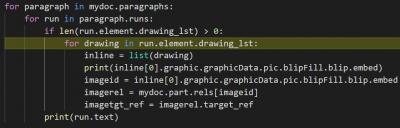
Getting the image_ref of the rId was easy.
Now it is time to load the or access the zip file of the word document.
Is that possible to get via python-Docx or do I need to load that separately? I had a look around but could not find any way to access the zip directly, so I did it myself. Imported zip file and then modified the line loading the document to make use of a variable (wordfile) so that I can change the name of the word document at one place.

Zf is the zip file object of the word document.
When I looked at the content of the ZF-object, I found it had a list of files.
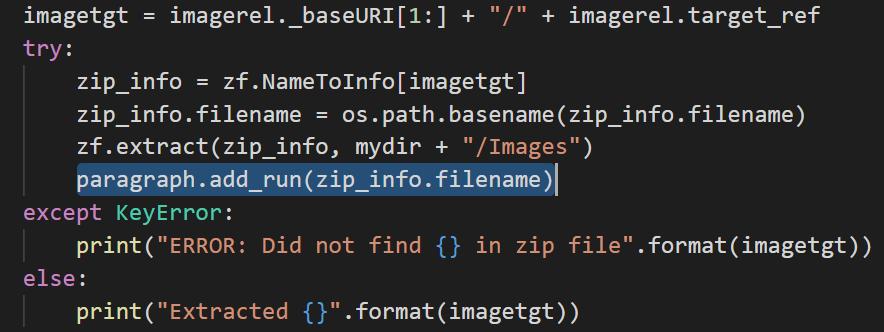
I also noticed that the filename is complete with the path to the subfolder. I need to create this filename to get to the data. The imagerel object had a base URI that combined with target_ref would make up the filename.
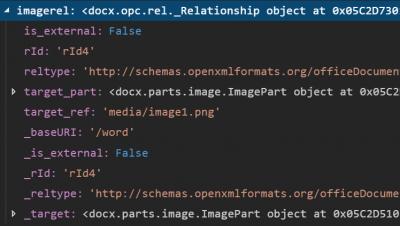
Of course, I had to remove the first character of the _baseURI and add a slash. I came up with this formula:
![]()
This, combined with extraction of a file as I found it on the Internet, gave me this:
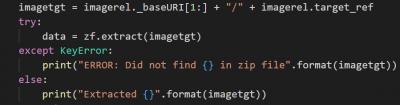
Look, this works as such. The image was extracted. One small problem, though. The internal structure of word document was included so there was a word folder and in that folder, a media folder and in there was the image. A success, with a snag.
To solve this, I found it is possible to modify the path of the file before extraction.
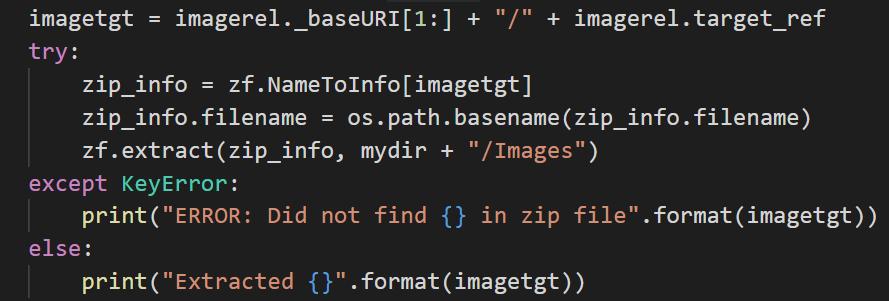
When the path of the filename is removed from the zip_info part, then it can be extracted to my folder.

Wow, this is great stuff!
Now I need to enter the name of the file into the text as well. That was very easy, actually.
When done with the word document, I save the result. Then I tried to close it, but that is not built into the library. I decided that I take del and hopefully that is working as I intend it to do.
From here, I will only need to think about how to use this program. I would like to be able to use “send-to” on a word document and then send it to my program. That would be neat.
So to do this, I open a new Windows Explorer window with Win + E and then in the address bar I type shell:sendto.
In the folder that opens I create a shortcut, and I let it point to the python program I created. I give the shortcut a nice name.
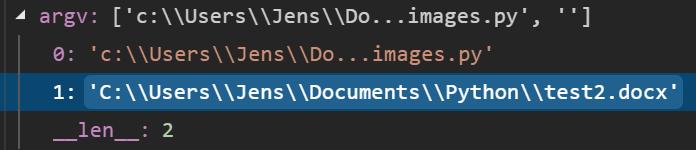
Now when that is done, I can start the program, and when it is started, the first argument will be the file that I sent to the program. Now I need to figure out how to get that argument and make proper use of it.
I found it difficult to debug how the program will behave when running with send to. To simulate this, I placed a breakpoint at the beginning and modified the argument list to be what I think it will be when it runs for real.
Now it is time for bed. Finishing up tomorrow.
Day 6, 29 of July 29, 2019
It was really nice working with Python yesterday! I got the program to work with send-to in windows explorer. There are a few things I need to figure out, such as how to set an argument when debugging.
I found this in the documentation of Visual Studio Code, Help, and then Documentation. Section Python and then Debugging:
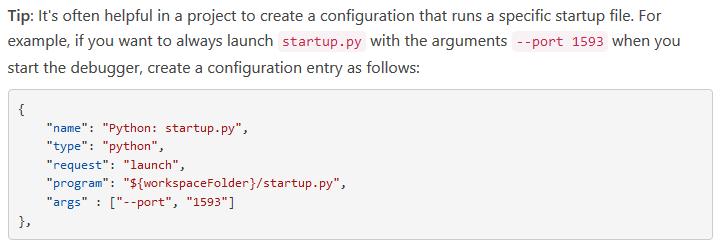
So I take menu option Debug and then Open Configurations.
This works much better. When I launch the debugger, my test argument is already on the list. I will need to remember to remove it from there when I am done. Luckily I can read my own blog-post on how to do that.
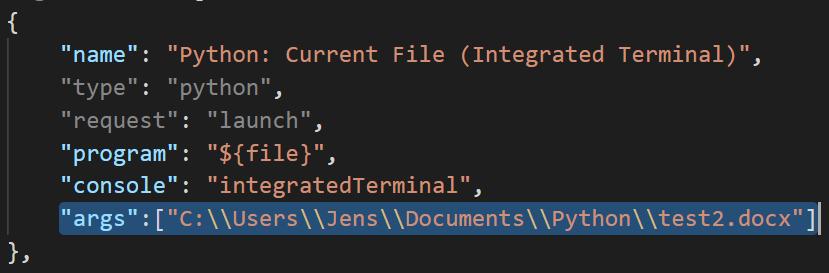
Now I need to improve the filenames of the images and the folder of the images. I would like images filenames to be prepended with the name of the word document, without extension.
The folder of the images should also have the name of the word document without extension so that I can sort the folder alphabetically and see that the directory with the same name is the images directory of that word document.
Now when the program is growing, I start to be annoyed with the names of the variables. It would be nice to know just by looking at the name what type it is. I will prepend variables with str when it is a string.
There is a command for renaming symbols in Visual Studio code. It gave me an error message.
After installing this, the command worked beautifully.
To get to the name of the word document without the extension, I had to use two functions.
![]()
I used split text that separates the extension from the rest of the path and returns this in a list. I used the first item in the list. Then from the first item, I removed all the path information, and that gave me the name of the document without any path or extension. I called this new variable for strBaseName.
Here below is the final program:
import docx
import os
import xml
import zipfile
import sys

if len(sys.argv) != 2:
    print("Please only call me with one parameter")
    sys.exit()

strWordFile = sys.argv[1]
doc_DocX = docx.Document(strWordFile)
doc_ZipFile = zipfile.ZipFile(strWordFile, 'r')
strBaseDir = os.path.dirname(strWordFile)
os.chdir(strBaseDir)
strBaseName = os.path.basename(os.path.splitext(strWordFile)[0])

for paragraph_Element in doc_DocX.paragraphs:
    for run_Element in paragraph_Element.runs:
        if len(run_Element.element.drawing_lst) ≻ 0:
            for drawing_Element in run_Element.element.drawing_lst:
                inline_NodeList = list(drawing_Element)
                print(inline_NodeList[0].graphic.graphicData.pic.blipFill.blip.embed)
                strImageId = inline_NodeList[0].graphic.graphicData.pic.blipFill.blip.embed
                image_Rel = doc_DocX.part.rels[strImageId]
                strImageTgt = image_Rel._baseURI[1:] + "/" + image_Rel.target_ref
                try:
                    ZipInfo = doc_ZipFile.NameToInfo[strImageTgt]
                    ZipInfo.filename = strBaseName + "_" + os.path.basename(ZipInfo.filename)
                    doc_ZipFile.extract(ZipInfo, strBaseDir + "/" + strBaseName)
                    paragraph_Element.add_run(ZipInfo.filename)
                except KeyError:
                    print("ERROR: Did not find {} in zip file".format(strImageTgt))
                else:
                    print("Extracted {}".format(strImageTgt))

doc_DocX.save(strWordFile)
del doc_DocX


 Sounds in the blogsystemNext version of the slideshowArchiving program in PythonLearning Machine Learning and Artificial Intelligence, Part 4Learning Machine Learning and Artificial Intelligence, Part 3Learning Machine Learning and Artificial Intelligence, Part 2Learning Machine Learning and Artificial Intelligence, Part 1Learning Python Part IIILearning Python Part IImpressionism and beyond. A Wonderful Journey 28 January 2018Fixing unresolved links after editingThis is my summer 2016 blog!Porting my blog for the second time, linksPorting my blog for the second time, editing part 7Porting my blog for the second time, editing part 6
 I moved from Sweden to The Netherlands in 1995.
Here on this site, you find my creations because that is what I do. I create.