| Suzana 23 February 2020 |
At the plot last day of February 2020 |
Next version of the slideshow
It is Friday evening, 7 February 2020, when I start this blog, and I am wondering: Would it not be nice to be able to compose a simple slideshow from within a word document for publishing on my blog?
I would like to be able to enter the pictures in a table with the images in one column and the caption in another. Then I would like my word conversion program to detect these tables and do the appropriate transformation that works on my site. A couple of years ago, I created my first slideshow widget for my site. The last time I used it was with my post about tits. The title was “Obsessed by tits.” Here it is https://www.malmgren.nl/post/Obsessed-by-tits
It would be nice to make the Word conversion program to convert to that format somehow. If needed, I will change that slideshow program.
I want the program to detect a specific type of table so that if I would like to, I could have different types of table-based features. That would be nice. For this, I create a table style that I load into the template of all pages.
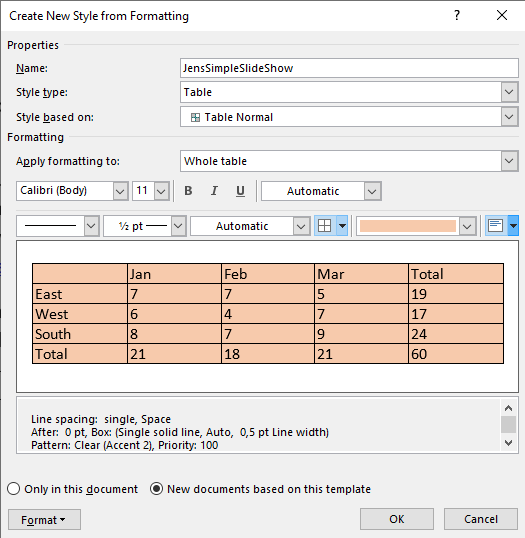
I make the background color orange to indicate that it is a slideshow type of table. It could be any color, but I just chose this color randomly.
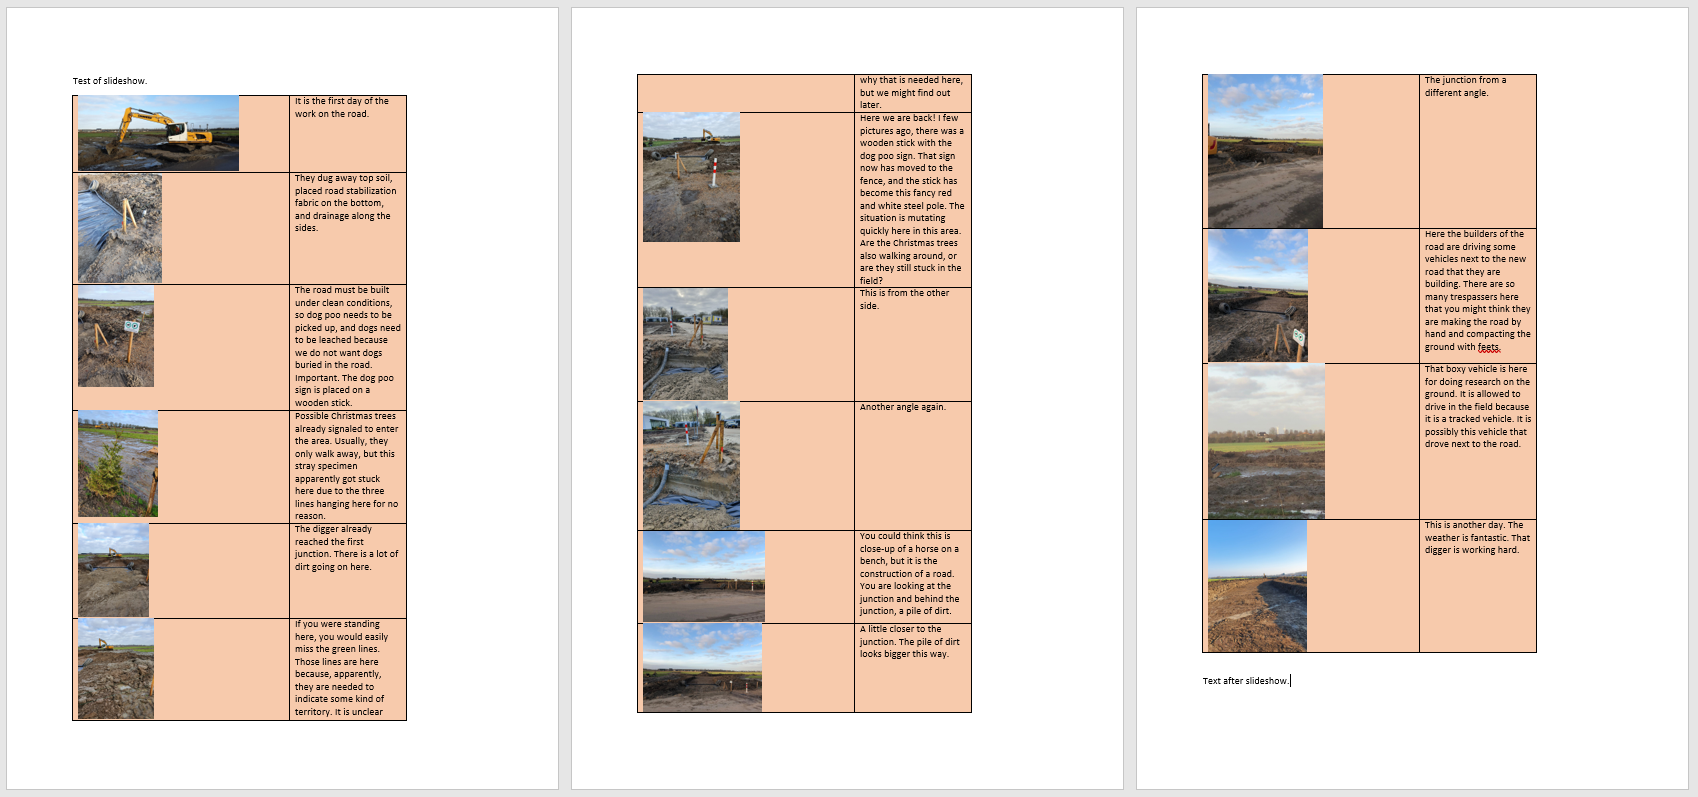
Here is a test document with the table.
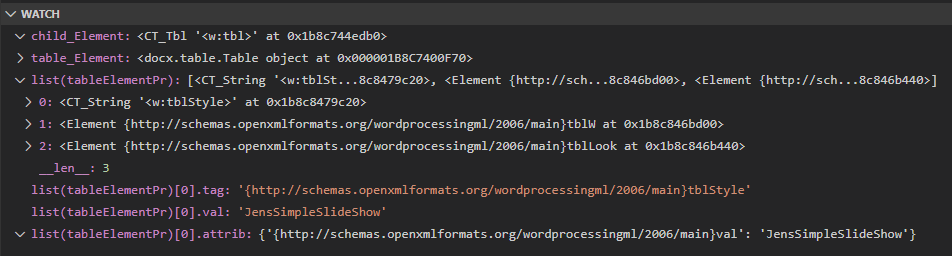
When looking at the XML document inside the word document, we can see that the table has the table-style “JensSimpleSlideShow.”

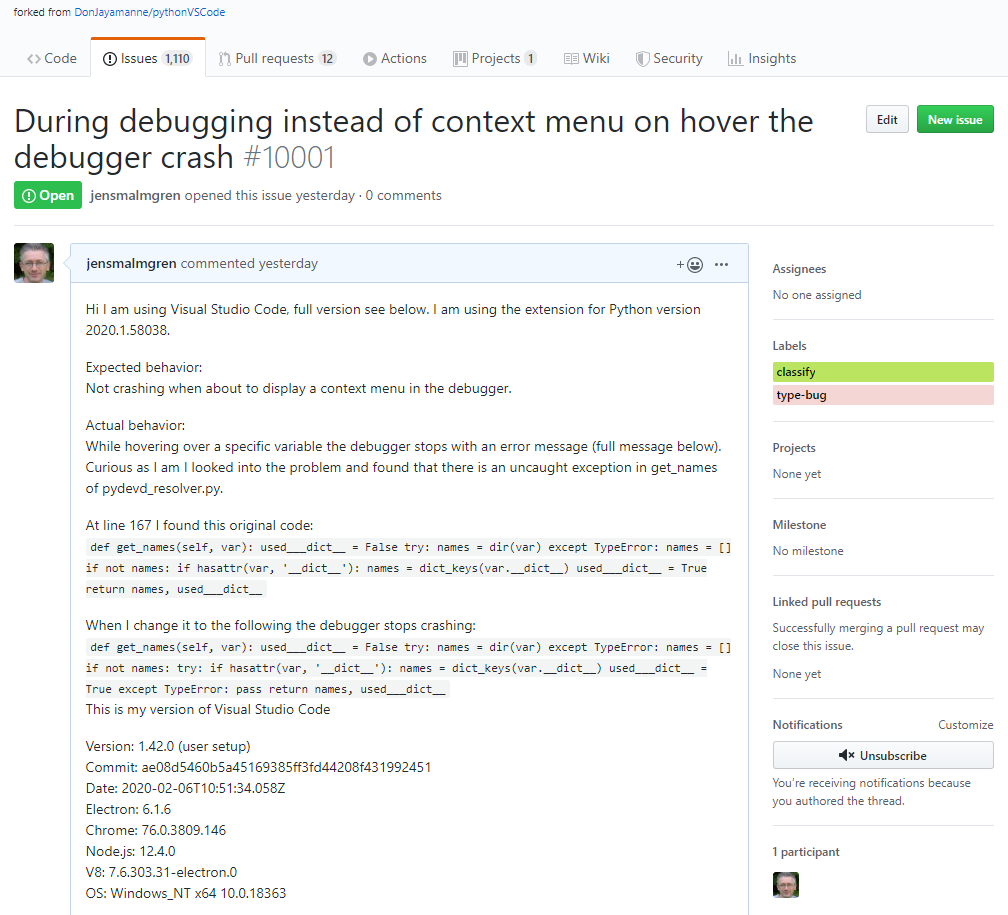
I started Visual Studio Code, loaded my program “ExportDocxToHtml.py,” placed a breakpoint, and started debugging. The thing that happened was that the program started, and then when I hovered with the mouse over the variables at the breakpoint, the debugger stopped with a very long error message.
That was odd.
It took me some time to realize what was going on. There was a little bug in the python extension of Visual Studio code. I found the place and corrected it. Then I was thinking that I would perhaps tell the makers of what I found, so I decided to report it. That took some while. I had to log into GitHub and find the forum working on this code, and there I entered an issue report, as well as I could. It is the first time, so we will see if anyone liked it.
A few days later, I got this message:
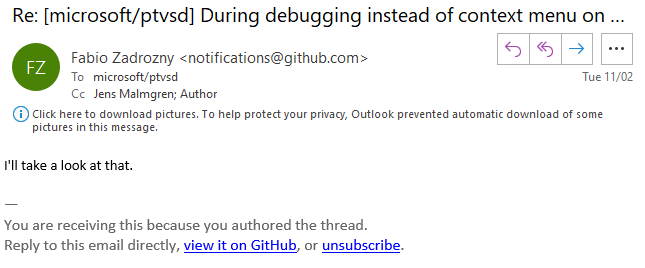
Another couple of days:
Was it fixed? No idea. Anyway, back to the story.
With the debug crash out of the way it looked like this:
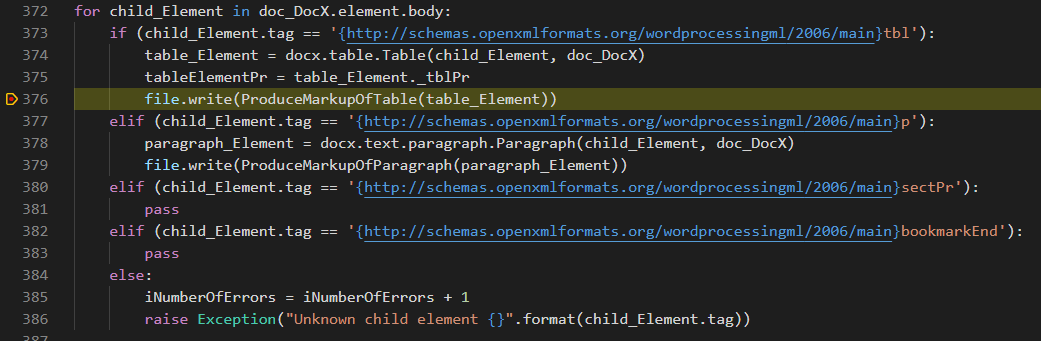
Here is the same code but in a code block:
for child_Element in doc_DocX.element.body:
    if (child_Element.tag == '{http://schemas.openxmlformats.org/wordprocessingml/2006/main}tbl'):
        table_Element = docx.table.Table(child_Element, doc_DocX)
        tableElementPr = table_Element._tblPr
        file.write(ProduceMarkupOfTable(table_Element))
    elif (child_Element.tag == '{http://schemas.openxmlformats.org/wordprocessingml/2006/main}p'):
        paragraph_Element = docx.text.paragraph.Paragraph(child_Element, doc_DocX)
        file.write(ProduceMarkupOfParagraph(paragraph_Element))
    elif (child_Element.tag == '{http://schemas.openxmlformats.org/wordprocessingml/2006/main}sectPr'):
        pass
    elif (child_Element.tag == '{http://schemas.openxmlformats.org/wordprocessingml/2006/main}bookmarkEnd'):
        pass
    else:
        iNumberOfErrors = iNumberOfErrors + 1
        raise Exception("Unknown child element {}".format(child_Element.tag))
In this version, I had added an extra variable tableElementPr so that it would be easier to check these values in the debugger. I inspected the values of the child element carefully:
If you expand the image (here above) by clicking on it, you can see that the child_Element is a table. That is what I would like to detect.
Let’s assume that there is always a table property element for a table. Assumptions like these are deadly for regular programming, but as long as I am the only one suffering the bugs, I can make assumptions like that. Okay, there is a table property. If I cast the table property to a list, I can walk the elements. If there is an element with the tag name tblStyle, then we can check if the value is “JensSimpleSlideShow” then, yes, we have a table of the new style. If we don’t have this style name, then it is a regular table. I suppose I make a separate function for the new table. Now it is just a question of encoding this into python and get going.
But first, I Googled this “python get element in an array with specific criteria.” There came no simple things for objects in lists. I took this solution: https://stackoverflow.com/questions/7125467/find-object-in-list-that-has-attribute-equal-to-some-value-that-meets-any-condi/7125547
(Here is a small note from future me. I later realized I want the table style name as a class-name for the table and that I can keep the default handling of th table to one function.)
Here is a new function:
for child_Element in doc_DocX.element.body:
    if (child_Element.tag == '{http://schemas.openxmlformats.org/wordprocessingml/2006/main}tbl'):
        table_Element = docx.table.Table(child_Element, doc_DocX)
        tableElementPr = table_Element._tblPr
        tableStyle = None
        for pr_Item in list(tableElementPr):
            if pr_Item.tag == "{http://schemas.openxmlformats.org/wordprocessingml/2006/main}tblStyle":
                tableStyle = pr_Item
                break
        if (tableStyle != None and tableStyle.val == "JensSimpleSlideShow"):
            file.write(ProduceMarkupOfJensSimpleSlideShow(table_Element))
        else:
            file.write(ProduceMarkupOfTable(table_Element))
    elif (child_Element.tag == '{http://schemas.openxmlformats.org/wordprocessingml/2006/main}p'):
        paragraph_Element = docx.text.paragraph.Paragraph(child_Element, doc_DocX)
        file.write(ProduceMarkupOfParagraph(paragraph_Element))
    elif (child_Element.tag == '{http://schemas.openxmlformats.org/wordprocessingml/2006/main}sectPr'):
        pass
    elif (child_Element.tag == '{http://schemas.openxmlformats.org/wordprocessingml/2006/main}bookmarkEnd'):
        pass
    else:
        iNumberOfErrors = iNumberOfErrors + 1
        raise Exception("Unknown child element {}".format(child_Element.tag))
It feels very powerful to get to this point already. I like this. Now I need to figure out how to layout the HTML for the slideshow. I already created a slideshow functionality on my blog (as I said), and my plan is to reuse it.
I look up the page on my blog.and view the source to see how I did it.
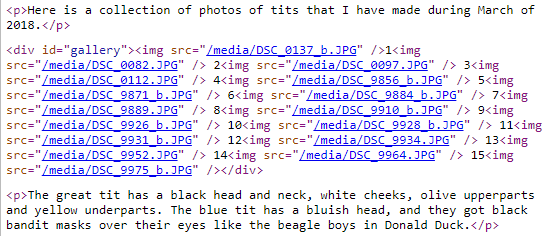
There is a javascript program on the page that kicks in when there is a div with the id “gallery.” My current version of the slideshow cannot display any captions. I will come back to that.
After some thinking about my current slideshow versus the new slideshow that I am creating here, I came to the conclusion that I want the structure of the new slideshow to be different. In the screenshot, here above, I used a structure that worked back then. Now I would like to improve on this. This means I will have two different slideshow structures. To cope with this, I decided to create the new slideshow from scratch using elements from the previous, and when it is finished, I will go back to blog-posts with slideshows and port them over to the new structure. When all blog-posts with old slideshows are ported, I can remove the old slideshow scripts from the site.
This will be the new structure:
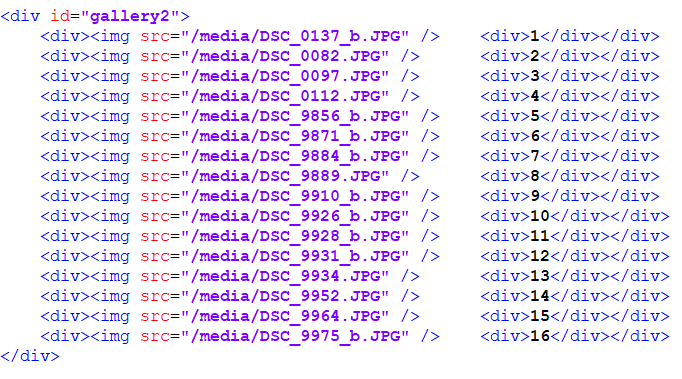
Click the image if you want to see a higher resolution version. The numbers here represent the possible caption.
I look at what this is and how close this is to a regular table. If I could just use a regular table, I could skip so much work. There will be work anyway, but it will be elsewhere.
If I, for example, chose the table-style name in Word to be transformed into a class-name by the Python program, then I could detect that in the client browser and let the JavaScript use the data from the regular table structure instead of a custom structure. An additional benefit of doing that will be that I can make all sorts of different tables, and the Python program will stay unchanged. I think I will do that instead. I went back to what I already wrote in this blog post and added a “Note from future me.”
It was a good decision because when I worked on it, I realized that inside the table handling function, I called the table handling function itself if, in a cell, there was a sub-table.
Here is the new table handling function:
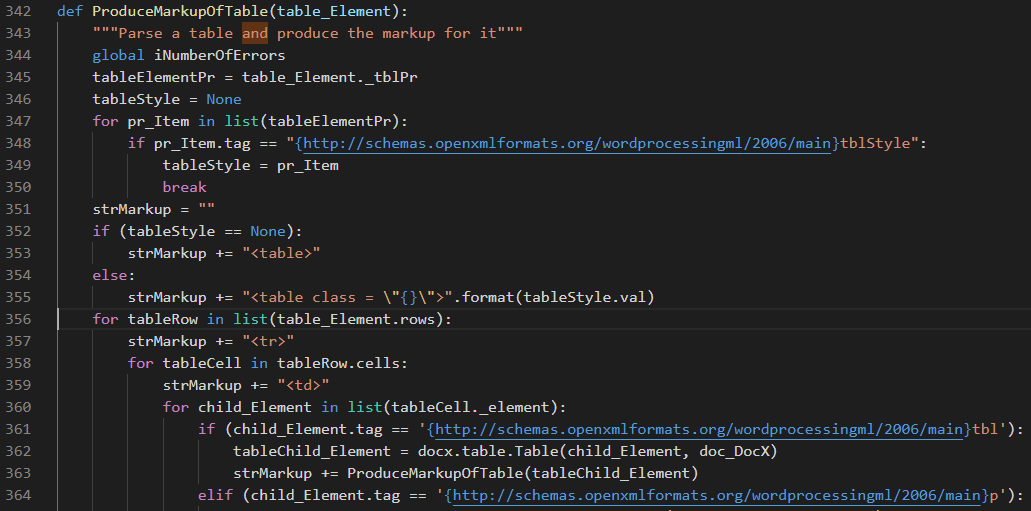
So if there is a table style name, then it is encoded into the class name at 355.
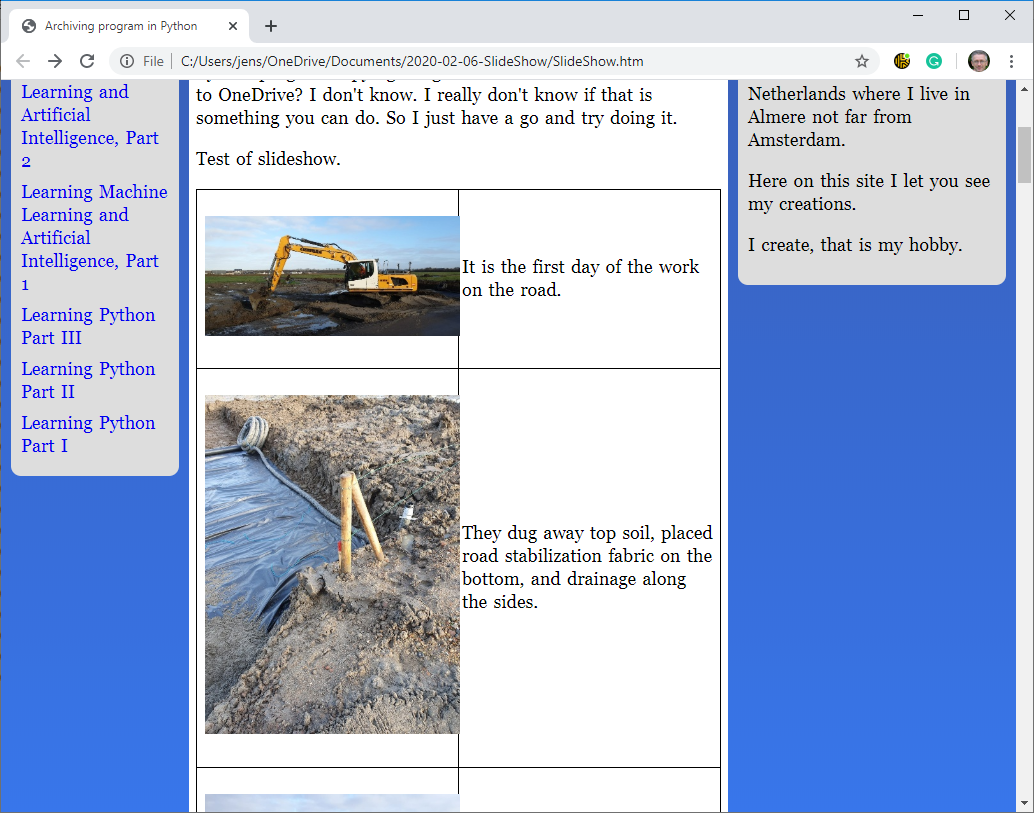
My test case from earlier then looks like this:

With this, I get the added benefit that all the conversion of the images is done. I got two versions, a high-res and a low-res. That is nice.
With this, the work in the Python program “ExportDocxToHTML.py” is done. Now it is time to switch over to how the slideshow will work in the browser. If you are familiar with web development, this is something you know about, but if that is new to you, I could as well explain what will happen next and why.
The content for my blog is written in Word. When I am done with a blog post, I use my Python program to extract the images and to export the texts as HTML. That HTML can I enter as a page in my blog. The blog system I built myself, and you can find all the information about how it is made as blogs.
When looking up a URL of my site, the webserver replies with that HTML page. The body of the HTML is created by the Python program. There are menu items and side panels generated on the fly by the server. The HTML is transferred to the browser, and it starts to render the page. If there are additional items to load from the server, such as images, etc., then these are requested subsequently.
The page may also contain JavaScript embedded in the page. JavaScript usually comes into action when the page has been loaded. Next up, I will work on that JavaScript to make sure it will handle the table of the slideshow in a way that it works nicely.
I will need to set up some kind of development environment so that I can work on the slideshow. There are clever add-ins for developing JavaScript in Visual Studio Code, but I figured I will do this in the simplest way possible, I will do this with a text editor and Chrome, locally on my computer.
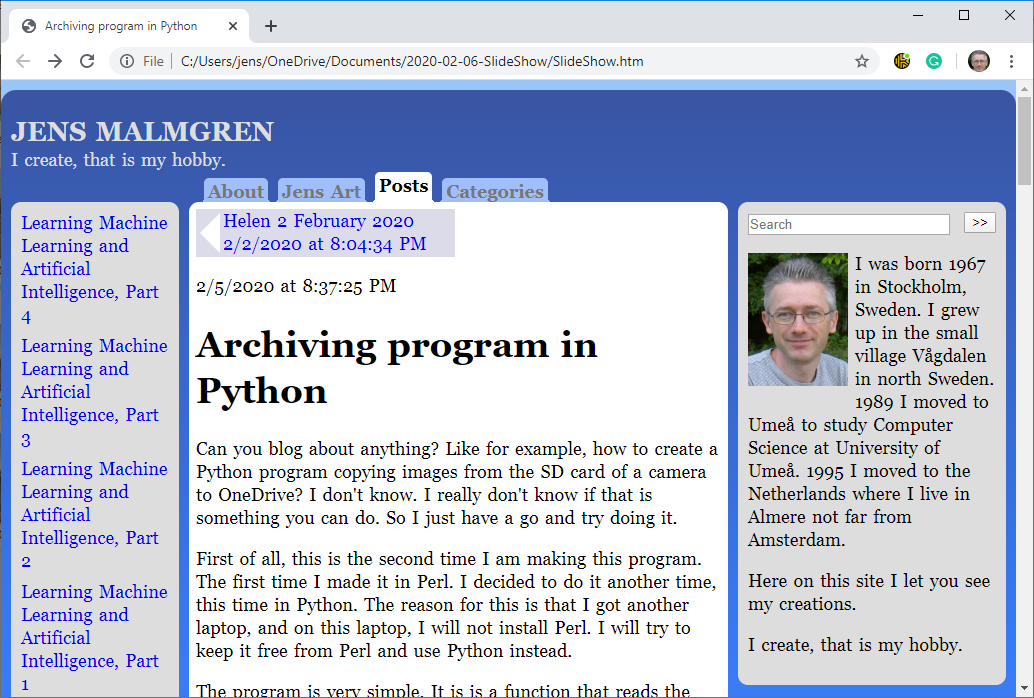
Before I have my working environment, I need to get things set up locally. First, I go to my live site and pick the HTML source of the front page. I save this locally. This is how it looks in Chrome:

There is some stuff missing here. First of all, the styles, I download these and link them in the HTML file.
That looks familiar. It is not nice with the broken images in the left side panel, so I decided to remove those. This is just for when I am programming and debugging this locally, so I don’t need them anyway. My headshot image on the right sidebar is just one image file, I fix that.
The date and time in the screenshot here above are not adjusted because I have not downloaded the jQuery library yet. I notice that on the live server, I use a rather old version of jQuery, so I decided to download the latest version 3.4.1.
Here jQuery is activated. I can see that because the dates are converted. If I switch the browser to Swedish, the top part of the page looks like this:
Now I almost have a test page for my new slideshow functionality. First, I inject the table that the Python program created. It assumes the page is displayed on a server so that all links are prepended with a slash indicating the root of the site, and we don’t have that here, so I had to remove that slash to make it work locally.
This is it. Now the work can begin. This is the JavaScript of the page right now before I started working on the code:
var pix = new Array();
var _iPix = 0;
var gallery = null;

function initImages()
{

	gallery = document.getElementById("gallery");
	if (gallery != null)
	{
		if (gallery.childNodes.length ≻ 0)
		{
			_iPix = 0;
			for (var j = gallery.childNodes.length - 1; j ≻= 0; j--)
			{
				var child = gallery.childNodes[j];
				if (child.nodeName != "IMG")
				{
					gallery.removeChild(child);
				}
				else
				{
					pix[_iPix] = child;
					gallery.removeChild(child);
					_iPix++;
				}
			}
			_iPix = 0;
			$(pix[0]).appendTo($(gallery));
			$("#gallery").show();
			setInterval("change()", 1200);
		}
	}
}

function change()
{
	if (gallery != null)
	{
		var image = null;
		do
		{
			image = pix[_iPix];
			if (image != null && image.complete)
			{
				$("#gallery").height($("#gallery img").height());
				$("#gallery").width($("#gallery img").width());
				$('#gallery img').remove();
				$(image).appendTo(gallery);
				$("#gallery").css('height','auto');
				$("#gallery").css('width','auto');
			}
			_iPix = _iPix + 1;
			if (_iPix ≻ (pix.length - 1))
			{
				_iPix = 0
			}
		} while ($(image).height() ≺ 30)
	}
}

$( document ).ready(function() {
	var pre = document.getElementsByTagName('pre'),
        pl = pre.length;
    for (var i = 0; i ≺ pl; i++) {
        pre[i].innerHTML = '≺span class="line-number"≻≺/span≻' + pre[i].innerHTML.replace(/≺/g, '≺').replace(/≻/g, '≻') + '≺span class="cl"≻≺/span≻';
        var num = pre[i].innerHTML.split(/
/).length;
        for (var j = 0; j ≺ num; j++) {
            var line_num = pre[i].getElementsByTagName('span')[0];
            line_num.innerHTML += '≺span≻' + (j + 1) + '≺/span≻';
        }
    }

	$('time').html(function()
	{
		var strDate = $( this ).attr('datetime');
		var reDate = /^(d{4})-(d{2})-(d{2})T(d{2}):(d{2}):(d{2})([+-])(d{2}):(d{2})$/;
		var arrayComponents = [];
		var iZoneOffset = 0;
		strDate.replace(reDate, function(match,y,m,d,h,min,sec,zs,zh,zm)
		{
			for(var bits = [y,m,d,h,min,sec,zh,zm], i = 0; i ≺ 8; i ++)
			{
				arrayComponents[i] = parseInt(bits[i], 10);
			}
			arrayComponents[1]--;
			iZoneOffset = (arrayComponents[6] * 3600 + arrayComponents[7] * 60) * (zs == '-' ? 1000 : -1000);
		});

		var d = new Date(Date.UTC.apply(Date, arrayComponents) + iZoneOffset);
		var strUserPreferredLang = 'sv-SE';
		$( this ).text( d.toLocaleDateString(strUserPreferredLang) + " at " + d.toLocaleTimeString(strUserPreferredLang) );
	});

	initImages();
});
This is a very simple code, but I like to keep it simple. It is great how this story progresses. We started off in Word with a table, and then we got that transformed into HTML with Python. I even learned how to fix a bug in Visual Studio Code (Python Extension), and now we switch over to JavaScript and programming in Chrome. Right now, I have no idea exactly where this is going. There will be a next and a previous button, an image, and below that the caption of the image.
The existing code handles:
- the line number of code blocks,
- the transformation of escaped gt/lt-characters into real characters,
- the formatting of dates,
- the slideshow.
It is only the slideshow that we will modify. When the page finished loading, the document ready function is running, and the last line of that is the call to the function initImages. We will take this really slowly. First of all, we would like to find out that there is a table with the class.
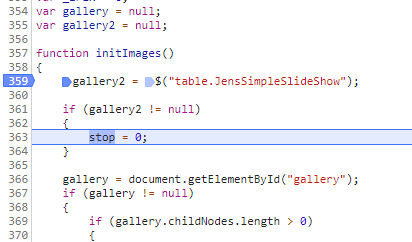
Here I defined a new variable gallery2, and I selected the table only if it has the style. This is a screenshot from the development environment of Chrome. You can open that when you hit F12. In the tab sources, you find the source code and the development environment.
From there on, I started porting over the old code to the new situation. Little difference here is that I am making use of more of the features that jQuery is providing compared to the old slide show. The old, old slideshow was created a long time ago, and I don’t even think jQuery existed back then.
The new initialization routine looks like this:
	gallery2 = $("table.JensSimpleSlideShow");

	if (gallery2 != null)
	{
		var rows = $(gallery2).find("≻ tbody ≻ tr");
		if (rows.length ≻ 0)
		{
			_iPix = 0;
			for (var j = rows.length - 1; j ≻= 0; j--)
			{
				var child = rows[j];
				if (child.nodeName != "TR")
				{
					gallery2.removeChild(child);
				}
				else
				{
					pix[_iPix] = child;
					$(child).remove();
					_iPix++;
				}
			}
			_iPix = 1;
			$(pix[0]).appendTo($(gallery2));
			$("#gallery").show();
			setInterval("change()", 1200);
		}
	}
There is not much difference there. Besides, it is not finished yet. I left the code in there showing the gallery when done with initialization. I will come back to that at a later stage.
The initialization deletes the images from the page. Or rather, it deletes the rows from the table. The rows are stored in an array, and we insert the images from that array in the change function. Here is the new change function:
	if (gallery2 != null)
	{
		var image = null;
		do
		{
			image = $(pix[_iPix]).find("img");
			if (image != null && $(image)[0].complete)
			{
				//$("table.JensSimpleSlideShow").height($("table.JensSimpleSlideShow img").height());
				//$("table.JensSimpleSlideShow").width($("table.JensSimpleSlideShow img").width());
				$('table.JensSimpleSlideShow tr').remove();
				$(pix[_iPix]).appendTo(gallery2);
				//$("table.JensSimpleSlideShow").css('height','auto');
				//$("table.JensSimpleSlideShow").css('width','auto');
			}
			_iPix = _iPix + 1;
			if (_iPix ≻ (pix.length - 1))
			{
				_iPix = 0
			}
		} while ($(image).height() ≺ 30)
	}
There are a lot of comments here. That is because I will come back to the commented lines in a moment.
So how is this looking on the page? Well, not bad, actually. Because I changed the CSS for this part of the page.
This is the CSS to display this:
.JensSimpleSlideShow td:first-child
{
	float:right;
	border:0 !Important;
	padding:3px;
	word-wrap: break-word;
	width:calc(100% - 10px);
	text-align:center;
	padding:0;
}

.JensSimpleSlideShow td:last-child
{
	float:right;
	border:0 !Important;
	padding:3px;
	word-wrap: break-word;
	width:calc(100% - 10px);
	text-align:center;
}

.JensSimpleSlideShow
{
	border:0 !Important;
	background-color:#f3f3f3;
}
The rules for the regular table interact with the rules for this table. To avoid that, we need to make the border invisible, for example.
From here on, I started experimenting with the slideshow script of the page. I started by porting the old script to handle a true table. That was process was interesting as such. The result was not what I was looking for, though. I recall that when I worked on the old slideshow, I decided to make the images equal size. That worked out pretty well. If the images were portrait as well as landscape mode, then the rest of the page would be jumping up and down. That was what I was seeing here.
I know what you are thinking. Stuff like, “could you not just download a ready-made slideshow?” No. That is not how I learn. That is no story. This is the process: I am going to struggle with this, there is no shortcut to it.
The thing I tried first was to let the program calculate the height and then set that overall slides. The thing is that such a solution is not responsive. If I go resizing the page, it is not going to follow.
After a couple of days, busy with other things, I got back to the slide show program!
I decided on making a viewport to keep things visible. Then I opted for using square slides. This was described at this blog: https://spin.atomicobject.com/2015/07/14/css-responsive-square/
Several days later…
It has been hectic lately. I had hoped I could finish this on the weekend, but I am already in the second week of this project.
The original design worked with the help of hiding and showing images. I made the Python program to work with the old system. In the old system, there was no room for captions. I think that would be nice. Also, the old system required that images were the same size, and that makes it less flexible. When the images are stored in a table in a word document, I really would like the system to be more flexible.
All methods based on hiding and showing cannot figure out how big all elements need to be because it is impossible to measure the size of something hidden. Because of this, I started working on a viewport solution.
In a viewport, the actual slideshow is much bigger, but it is only a small part that is visible.
I started this project on a Friday evening,7 February, and it is now a Friday evening, 20 February! The time flies awfully quick at times. The past week I got the working of the viewport working. It tried many things, such as placing divs next to each other with floats. I tried a table with the slides next to each other. All these solutions could not adapt the slides to the size of the viewport. I need that because I want the design to be responsive. The slide needs to be exactly the same size as the viewport, and I preferred to get that done without JavaScript.
My solution was to use a flexbox inside the viewport (ssinner). The viewport is a div (ssouter) that has overflow set to auto. That way, only the visible part is displayed, and if there are things outside the visible part, then there is a scrollbar. That scrollbar is hidden; this only works on WebKit browsers, but I am fine with that.
Inside the scrollable part (ssinner), the slides are present, and since they are in a flex-box, they are placed next to each other. For this, I also set the direction to row. The viewport is set to the full-width minus a little border. The slides are set to the same width minus a little distance equal to padding. When the viewport change size, the slides are changing exactly the same. That makes it responsive. This solution requires no JavaScript to change the size of each slide.
The slide is two divs, and since divs take up the full width, they stack on top of each other. In the upper div, I place the content of the picture column, and in the bottom div, I place the content of the caption column from the table. The rendering of these elements takes place with JavaScript. That is not good because it delays the loading of the page, I will need to change the rendering to happen in the Python program. But that is for later.
With the layout done, it was a question of scrolling the viewport, wait a moment, and scroll again. At first, I tried scrolling by just setting the scroll position. It worked, but it did not look smooth. I decided to use animation to let the scrolling move in the pictures a little more slowly. When I came to the end of the slideshow, I just let it jump to the beginning without any smooth magic. That is fine for now.
With that done, I started working on the navigation.
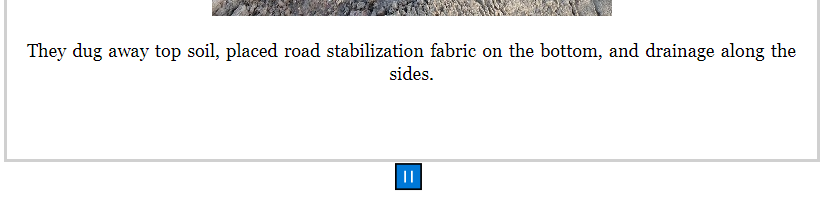
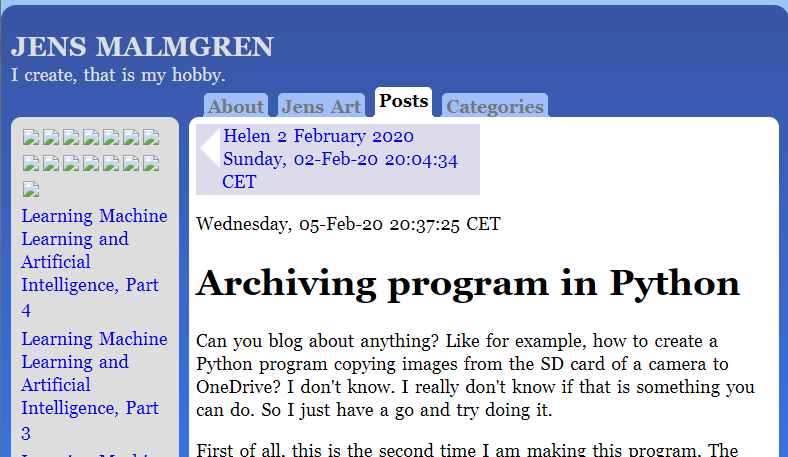
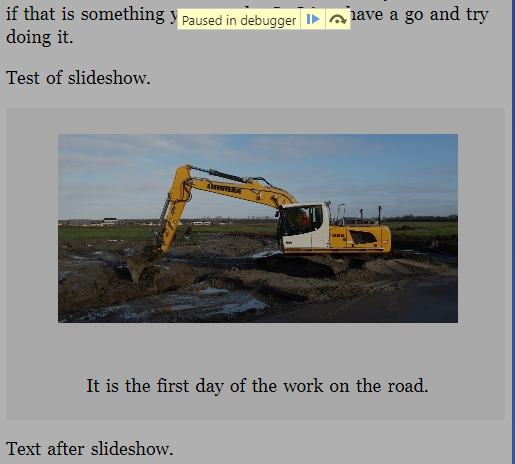
When the slideshow is displayed the first time, it looks like in the image here above. The slideshow is running. The images come in from the right smoothly, stays a short moment, and leave to the left, smoothly. The button is nothing fancy. It is a Unicode character with the pause symbol. I did not know there were colored characters as well, so this was new to me.
When hovering over the button, the cursor changes to a pointer, and there is a light blue square around it. Obviously, that does not work on a touchscreen, but it is nice to have. So when clicking on the pause symbol, or tapping, the slideshow stops and then this is displayed, see below.
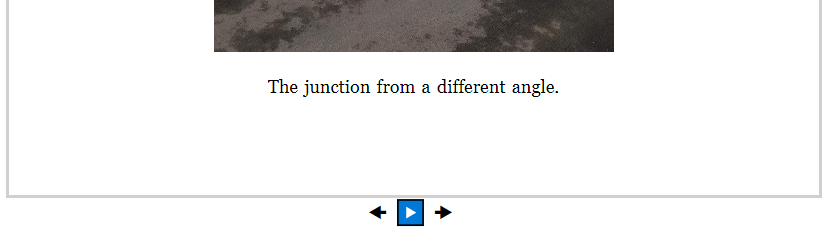
In this mode, it is possible to go left and right, or you can click on the middle button to start the slideshow again.
I was happy with the result when my son came by, and we started talking about how the slideshow worked. He is also a developer. We concluded that it was nice with the smooth effect inside the slideshow, but when coming to the edge, it did not look so nice.
We tried scrolling back to the beginning smoothly, but that went so fast that it was annoying.
Then we talked back and forth on how to solve this, and we decided to use his suggestion: Add the first image of the slideshow to the end. Then when coming to the final slide, jump to the beginning without smooth effect. Since they are identical, you don’t see that it is happening. We worked on this an entire evening.
The next subproject of this slideshow is to figure out what happens if one adds two different slideshows to the document. As it worked initially, the slides ended up in the very first slideshow. To remove this “feature,” I removed all global variables, the pause/run status had to be stored as an attribute of the slideshow. The current slide also became an attribute.
When all this was done, and I had decided to port the rendering to Python, I changed my mind. It would be the correct thing to do, but this is a hobby project, this is not perfect, but it is good enough for me.
When I had decided not to port the rendering to Python, I also decided to make the old slideshow to work with this new functionality. I introduced a function that converted the old gallery data on the fly to the new form.
With this, the slideshow project could be published!
Later I found better icons for the buttons.


 Sounds in the blogsystemLearning Python Part IIILearning Python Part IIImpressionism and beyond. A Wonderful Journey 28 January 2018Fixing unresolved links after editingThis is my summer 2016 blog!Porting my blog for the second time, linksPorting my blog for the second time, editing part 7Porting my blog for the second time, editing part 6Porting my blog for the second time, categories part 3Business cards, version 1Porting my blog for the second time, deployment part 2Not indexed but still missing? Google hypocrisy.A new era: Nikon D5100 DSLR, Nikkor 18 - 55 and 55 - 300!Porting my blog for the second time, deployment part 1
 I moved from Sweden to The Netherlands in 1995.
Here on this site, you find my creations because that is what I do. I create.